Open-loop simulation:
(1) open Simulink by double-clicking Simulink from the menu of the Matlab command window.
(2) This opens the Simulink window and from the menu bar select a new file.
(3) A new file of Simulink is opened and it is named (default) as untitled. mdl. All Simulink files have mdl extension.
(4) From the Simulink library open the ‘continuous’ icon. The transfer function is given in the continuous library as 1/(s+1) and transport delay is also given in the continuous library. Drag the transfer function and drop in the new Simulink file. Similarly, drag and drop transport delays also.
(5) Now open the Simulink library icon ‘sources’. Drag the step function from it and drop it into a new file.
(6) Now open the Simulink library icon ‘sinks’. From ‘sinks’ drag and drop ‘scope’ and ‘untitled mat’ into the Simulink file.
(7) Now connect all these blocks by using a left click of the mouse. If the existing line between two blocks is to be joined to another block, then use the right click of the mouse.
(8) Once the block diagram is over, change the output file name from the untitled mat to your pet name by double-clicking it. The default output variable is an in that file and you can change it according to your problem. Set the sample time as 0.01 which means the data is stored for every 0.01 sec. press ok.
(9) Double-click the transfer function. The numerator and denominator are to be given according to your problem in the decreasing order of s. Click ok
(10) Double-click click the steps icon and give the time at which the step change is to be given to the process and the initial and final value for the step is to be given and the sample time is the same as 0.01.
(11) Double click the transport delay and set the delay of the process as per the problem at hand and press ok
(12) Save this file with a name. mdl
(13) To simulate this block diagram, open the simulation in the menu bar and select the simulation parameters in it. Give the stop according to your problem and press ok.
(14) To simulate the block diagram press the solid forward arrow symbol in the menu bar.
(15) Once the simulation is over, open the Matlab command window and load the output file using the command load.
(16) Example: >>load out.mat
(17) To plot the step response use the command >>plot(y(1,:),y(2,:))[y is the output variable name which is used instead of default ans). This means the first row of y which is a time vector is plotted against the response vector (2 rows of y). Then label the axis using the label and label commands.
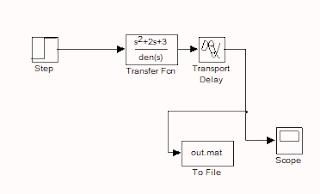
The open-loop block diagram is given below
Closed loop simulation:
For closed-loop simulation, additional blocks of the PID controller and a summation block are required. The additional step function is required for regulatory or load problems.
PID controller is available in Simulink extras of the Simulink library. Double-clicking Simulink extras, select additional linear. PID controller is available in that. Drag and drop PID into an untitled Simulink file along with the transfer function, step, to file, and scope.
Drag and drop sum block from Math of Simulink library and we need two of them for the simulation of the servo (setpoint change) and the regulatory problem (load change).
Connect the blocks as shown in the figure given below.
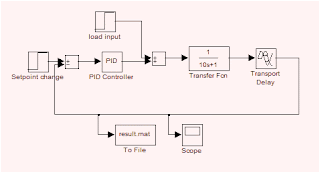
To give PID values, double-click the PID block. Proportional gives kc value, integral gives kc/I, and derivative gives kc*I value. Click ok.
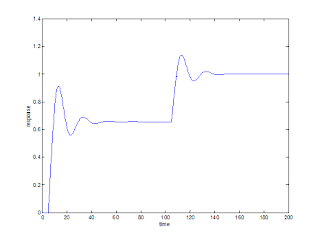
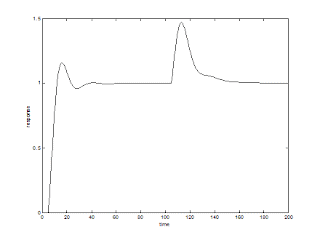
For example, consider a transfer function model of a process as. Conduct closed-loop simulation for servo and a regulatory problem for a unit set to change in setpoint at time=0 and a unit step change in load at time=100.
(a) P controller with kc=1.9
(b) PI controller with kc=1.7 and I=14.3s
(c) PID controller with kc=1.6, I=12.5s,D=0.5s
To simulate for both servo and regulatory simultaneously, double-click step (setpoint input) and time are set equal to zero and the initial value is zero and the final value is 1. sample time is 0.01. Now double click step (load input) and the time are set equal to 100 (it is the time at which servo response reaches 1) and the initial value is zero and the final value is 1. The sample time is 0.01. i.e. Load is initiated after 100s.
Simulation time is fixed by selecting simulation parameters in the menu bar. The simulation time should be around 200 to stabilize the regulatory response as the load step is initiated at 100.
Once the simulation is over, load the result file in the Matlab command window.
>> load result.mat
>> figure,plot(y(1,:),y(2,:),’k’)
>> xlabel ‘time’
>> ylabel ‘response’
Here are the output file name results. mat and the variable name is y. The first row of y stores time and the second row of y stores response. The figures generated are
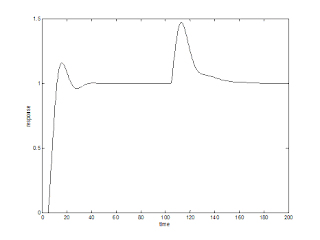
P controller
In PID block substitute P parameters as kc, 0I, and 0 for proportional, integral, and derivative time locations.
Simulate and then load the file in the Matlab command window and plot as shown below.
>> load result.mat
>> figure,plot(y(1,:),y(2,:))
>> xlabel ‘time’
>> ylabel ‘response’
PI controller
In PID block substitute PI parameters as kc, kc/I, and 0 for proportional, integral, and derivative time locations.
Simulate and then load the file in the MatLab command window and plot as shown below.
>> load result.mat
>> figure,plot(y(1,:),y(2,:),’k’)
>> xlabel ‘time’
>> ylabel ‘response’
PID controller
In the PID block substitute PID parameters as kc, kc/I, and kc*D for proportional, integral, and derivative time locations.
Simulate and then load the file in Matlab command window and plot as shown below.
>> load result.mat
>> figure,plot(y(1,:),y(2,:),’k’)
>> xlabel ‘time’
>> ylabel ‘response’